|
Bracelet is 6 beads wide - can have 8 or 10 beads. For maximum "curviness", use 6
different types of beads of varying HEIGHT not width.To determine the relative heights, string 5 to 7
beads of each type on a needle or headpin, and line them up from
shortest to tallest.
| Curved Herringbone Bracelet |

|
Row 1: Weave the first row of beads using Ladder Stitch - 6 beads wide and 2 beads tall, all
size A. Leave a tail of thread of 6 - 8 inches.
Row 2: Weave 1 F and 1 E, 2 A, 2 A (Figure 1). After finishing the row
with a "turn" (see Herringbone Stitch Instructions if necessary),
remember to flip the beadwork around so you are again working from
right to left.
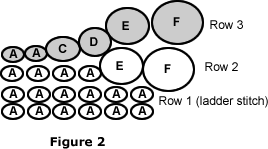
Row 3: Weave 2 A, 1 C and 1 D, 1 E and 1F (Figure 2).
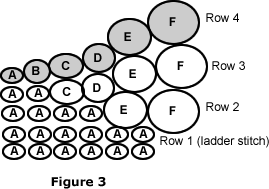
Row 4: Weave 1 F and 1E, 1 D and 1C, 1 B and 1A (Figure 3).
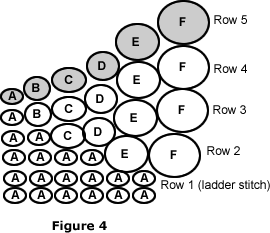
Row 5: Weave 1 A and 1 B, 1 C and 1 D, 1 E and 1 F (Figure 4).
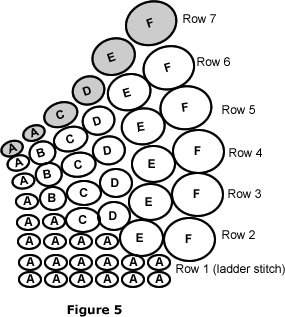
Row 6: Weave 1 F and 1E, 1 D and 1C, 1 B and 1A (Figure 5).
Row 7: Weave 2 A, 1 C and 1 D, 1 E and 1 F (Figure 5).
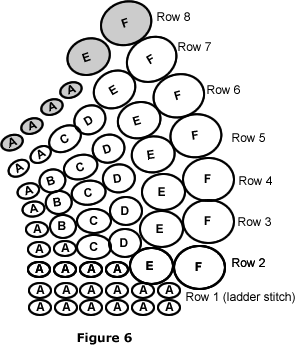
Row 8: Weave 1 F and 1 E , 2 A, 2 A (Figure 6). You have now completed
the first curve and should have 7 rows of FE, 5 rows of DC, and 3 rows
of BA as shown in Figure 6.
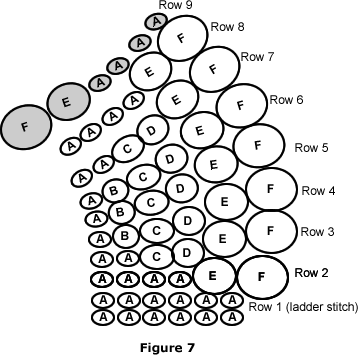
Row 9: Weave 1 F and 1 E, 2 A, 2 A (Figure 7).
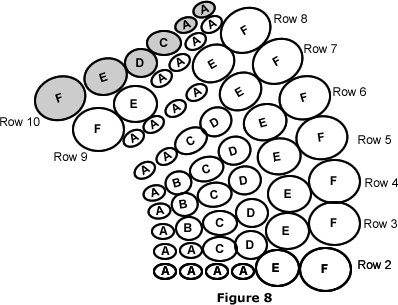
Row 10: Weave 2 A, 1 C and 1 D, 1 E and 1 F (Figure 8).
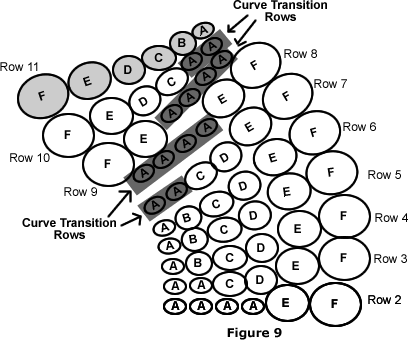
Row 11: Weave 1 F and 1E, 1 D and 1C, 1 B and 1A (Figure 9).
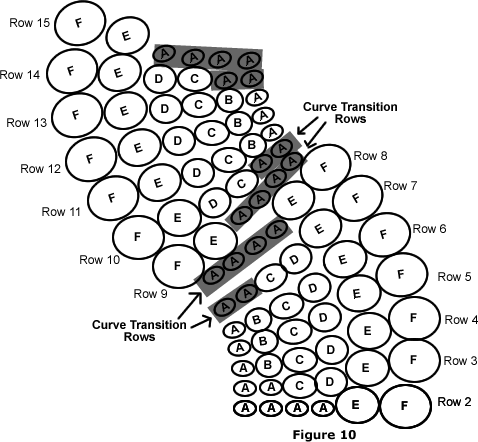
The graph in Figure 10 shows all of the rows for two curves. Follow this graph to complete rows 12 through 15:
Row 12: Weave 1 A and 1 B, 1 C and 1 D, 1 E and 1 F. Row 13: Weave 1 F and 1E, 1 D and 1C, 1 B and
1A.
Row 14: Weave 2 A, 1 C and 1 D, 1 E and 1 F.
Row 15: Weave 1 F and 1 E, 2 A, 2 A.
Repeat
rows 2 through 15 for the desired length of the bracelet. Bead two rows
of size A beads at the other end to match the first ladder stitch row.
|